A little over a year ago I invested in a DSLR camera as I got more into photography. I poured myself into online blogs, Outdoor Photographer magazine, and outdoor Instagram accounts to figure out how to make the most of said camera and how to become a “photographer”.
And I learned a lot— I learned about ISO, aperture, shutter speed, exposure. What I learned more than all of the technicalities is that a lot of photography, rather most of photography, is not about the camera. It’s more about the light, the rule of thirds, angles, editing, and luck.
A nice camera like a DSLR will give you a higher quality image, more creative freedom, and the ability to shoot in low light, but that doesn’t mean that your smartphone can’t crank out good images. They say that the best camera is the one you have with you, and I tend to agree.
I have used my phone to take pictures when I didn’t have access to my camera (the time I forgot my camera battery), or brought the wrong lens, or didn’t have time to pull my camera out of my bag.
Learn the Rule of Thirds
The rule of thirds is the idea of dividing a photo, or any art, into thirds in order to make it more aesthetically pleasing. This applies in a few ways. It can apply to the placement of the horizon line—you could have 2/3 of a photo be sky, or 1/3. It can apply to foreground as well in the same way. The rule of thirds also applies to photo subjects as well— you can shoot to have a subject take up about a third of a photo, or sit at a certain third. Usually, I tend to go either for dead center or off to one side.
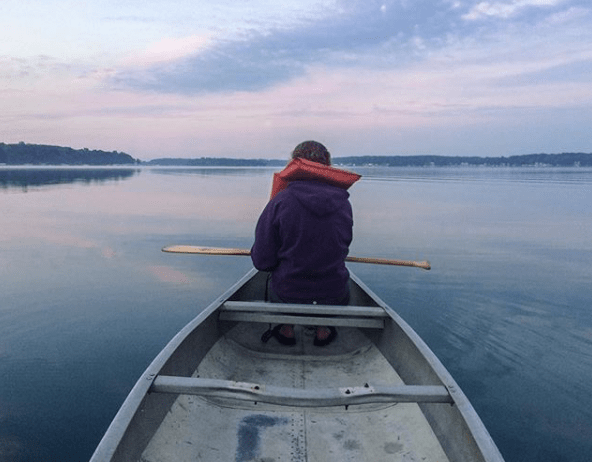
In the photo above, shot on an iPhone 5s, I placed the horizon line in the top third of the photo, and centered the canoe, with roughly one third of the image on either side of the canoe.

Look for Light
Lighting is one of the best things about photography and I will stand by that statement—any subject can be interesting in the right light. I took this photo on the aforementioned old iPhone, with a cracked screen, but it did the trick.
About an hour before sunset, the “golden hour” rays light up the conifers, the water, and the rocks and made for a good photo despite the lack of DSLR.

Straighten Your Horizon Line
See that line, where the sky meets the sea? STRAIGHTEN IT. This is my single biggest photo pet peeve—lopsided horizon lines. This photo doesn’t have nearly the same effect with the horizon line askew.

Learn What Editing Can Do for You
This one is an old photo, from well before I got a “real” camera and knew anything about photography. Through Adobe Lightroom, my editing tool of choice, I was able to make this photo more striking than before.
On this particular photo I…
- Decreased the luminance of the blue in the sky, which intensifies the blue
- Used the “sharpen” tool to increase pixel definition. The sharpen tool is can sort of “fake” a higher quality when it comes to smartphone photos
- Decreased the “lights” and increased the “darks”. This takes parts of the photo that are overexposed and darkens them, while lightening up parts that were in shadows
- Straightened the horizon line (see previous)
In hindsight, I think that the red jacket is a little too bright, and the buildings have a blue cast, which I could remove in Lightroom by selectively decreasing the saturation of the color blue or purple.

Go Easy on the Filters
On the subject of lackluster editing, check out the number I did on this circa 2015 photo of a field of poppies. Crooked horizon line (ew I hate it), the red is a little intense, and the blue of the sky is obviously the Instagram filter “clarendon”.
As a rule now, I try and keep my edits minimal. If I am going to increase vibrance or put a certain cast on a photo, I only do so about approximately 10-15%. Any more than this and generally a photo will look hyper-edited.

Be Flexible
For this photo out a plane window near Salt Lake City, I leaned over my youngest sister and took exactly one photo. It could’ve turned out better, and I would’ve like to have taken multiple shots, but sometimes you just play with the cards you’ve been dealt.
Overall, none of these are steadfast rules, just suggestions based on my limited experience. If hyper-edited is your style, go for it! Experiment some. Some people are purists, who don’t edit photos at all—more power to them! Some people like wild horizon lines, and the rule of thirds isn’t really a rule at all. Plus, at the end of the day, I’ve still got a lot to learn.
Further resources:

your photos are truely BEAUTIFUL!!
LikeLiked by 1 person
Thanks so much!
LikeLike
I enjoyed your post and agree that you can take great photos on your phone – I use my IPhone for all the photos I use for Instagram and my blog. I have told myself that I’m not allowed to buy myself a decent camera until I have mastered the technical aspects of photography on my I Phone!
LikeLiked by 1 person
That’s awesome! I won’t lie though, a nice camera is a lot of fun!
LikeLike
Great tips and boy, lovely!
LikeLike
Truly spectacular.. Even I m into photography too. Nice snaps and nice information.
LikeLiked by 1 person
Nice… I was not knowing many of these tips.. thanks for sharing
LikeLiked by 1 person
Glad it was helpful!
LikeLike
I enjoyed reading your tips and will employ them as
I go along. I have always enjoyed taking pictures and now want to concentrate on being a photographer and focus more on composition. Thank you.
LikeLiked by 1 person
I’m glad I could help! Good luck, look forward to seeing your work!
LikeLike